nail art
right this sway
by essie global lead educator, Rita Remark
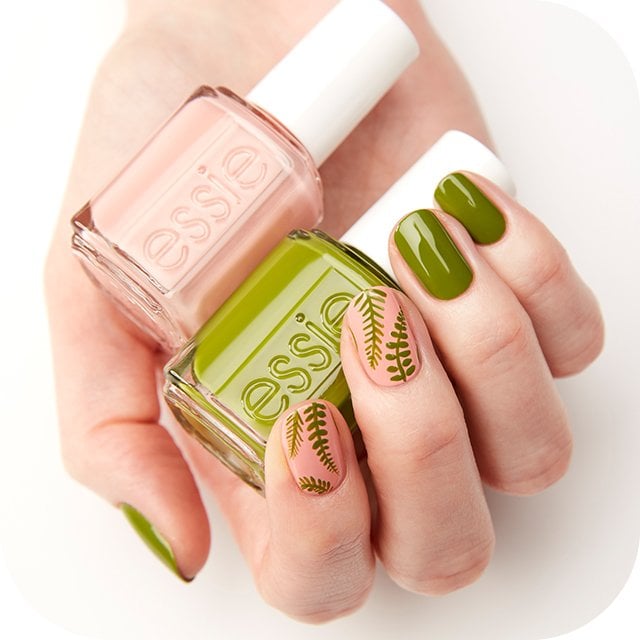
step 1:apply a thin coat of your preferred essie base coat.
step 2:apply two coats of day drift away to index and middle finger nails.
polish two coats of willow in the wind on the remaining nails.
step 3:with a detail brush dipped in willow in the wind, polish small curved lines on the drift away nails. 2-3 per nail.
step 4:add leaves to the stems. with the same brush a color, polish small dashed on either side of the lines, shortening them as they reach the top.
step 5: finish with gel setter top coat.
 essie
willow in the wind
$10.00
restorative and refreshing. this vibrant green nail polish with yellow undertones will help you find balance with breeze! (cream)
<ul style="list-style-type: disc;">
<ul style="list-style-type: disc;">
<li>inspired by a dreamy first date in a romantic rowboat for two, essie proudly introduces the permanent swoon in the lagoon 2022 collection. this nine-shade range offers a calming balance of natural tones and mood-boosting brights that allow you to day drift away effortlessly. so, row with the flow and see where this lagoon of love takes you!
</li>
<li>salon quality formula for flawless coverage</li>
<li>our exclusive easy glide brush for quick, even professional application on nails</li>
<li>from the essie collection, which has produced more than 1,000 shades and counting</li>
<li>over a thousand nuanced colors, essie original nail polish takes from the latest fashion and cultural trends to make your manicure possibilities endless, with a wink and story always on hand. your partner for playful inspiration.</li>
</ul>
<center><a href="https://www.essie.com/nail-polish/whats-new/swoon-in-the-lagoon" target="_self">see the collection</a></center> </ul>
essie
willow in the wind
$10.00
restorative and refreshing. this vibrant green nail polish with yellow undertones will help you find balance with breeze! (cream)
<ul style="list-style-type: disc;">
<ul style="list-style-type: disc;">
<li>inspired by a dreamy first date in a romantic rowboat for two, essie proudly introduces the permanent swoon in the lagoon 2022 collection. this nine-shade range offers a calming balance of natural tones and mood-boosting brights that allow you to day drift away effortlessly. so, row with the flow and see where this lagoon of love takes you!
</li>
<li>salon quality formula for flawless coverage</li>
<li>our exclusive easy glide brush for quick, even professional application on nails</li>
<li>from the essie collection, which has produced more than 1,000 shades and counting</li>
<li>over a thousand nuanced colors, essie original nail polish takes from the latest fashion and cultural trends to make your manicure possibilities endless, with a wink and story always on hand. your partner for playful inspiration.</li>
</ul>
<center><a href="https://www.essie.com/nail-polish/whats-new/swoon-in-the-lagoon" target="_self">see the collection</a></center> </ul>
 essie
day drift away
$10.00
get lost in your thoughts and dream away wearing this soft pink nail polish with neutral undertones (cream)
<ul style="list-style-type: disc;">
<li>inspired by a dreamy first date in a romantic rowboat for two, essie proudly introduces the permanent swoon in the lagoon 2022 collection. this nine-shade range offers a calming balance of natural tones and mood-boosting brights that allow you to day drift away effortlessly. so, row with the flow and see where this lagoon of love takes you!
</li>
<li>salon quality formula for flawless coverage</li>
<li>our exclusive easy glide brush for quick, even professional application on nails</li>
<li>from the essie collection, which has produced more than 1,000 shades and counting</li>
<li>over a thousand nuanced colors, essie original nail polish takes from the latest fashion and cultural trends to make your manicure possibilities endless, with a wink and story always on hand. your partner for playful inspiration.</li>
</ul>
<center><a href="https://www.essie.com/nail-polish/whats-new/swoon-in-the-lagoon" target="_self">see the collection</a></center>
essie
day drift away
$10.00
get lost in your thoughts and dream away wearing this soft pink nail polish with neutral undertones (cream)
<ul style="list-style-type: disc;">
<li>inspired by a dreamy first date in a romantic rowboat for two, essie proudly introduces the permanent swoon in the lagoon 2022 collection. this nine-shade range offers a calming balance of natural tones and mood-boosting brights that allow you to day drift away effortlessly. so, row with the flow and see where this lagoon of love takes you!
</li>
<li>salon quality formula for flawless coverage</li>
<li>our exclusive easy glide brush for quick, even professional application on nails</li>
<li>from the essie collection, which has produced more than 1,000 shades and counting</li>
<li>over a thousand nuanced colors, essie original nail polish takes from the latest fashion and cultural trends to make your manicure possibilities endless, with a wink and story always on hand. your partner for playful inspiration.</li>
</ul>
<center><a href="https://www.essie.com/nail-polish/whats-new/swoon-in-the-lagoon" target="_self">see the collection</a></center>
 base coat
smooth-e
$11.00
our new ceramide-infused formula fills uneven surfaces on the nail to provide a sleek finish. instantly primes nails for a smooth and even surface for color adhesion. provides a barrier to help prevent nail staining. the result: even and smoothed out ridges for a perfectly beautiful manicure.
base coat
smooth-e
$11.00
our new ceramide-infused formula fills uneven surfaces on the nail to provide a sleek finish. instantly primes nails for a smooth and even surface for color adhesion. provides a barrier to help prevent nail staining. the result: even and smoothed out ridges for a perfectly beautiful manicure.
 top coat
gel-setter
$11.00
<style type="text/css">
p.p1 {margin: 0.0px 0.0px 0.0px 0.0px; font: 12.0px 'Lucida Grande'; color: #000000}
</style>
<p class="p1">A clear topcoat that will give your nails gel-like essie color and shine day after day.</p>
top coat
gel-setter
$11.00
<style type="text/css">
p.p1 {margin: 0.0px 0.0px 0.0px 0.0px; font: 12.0px 'Lucida Grande'; color: #000000}
</style>
<p class="p1">A clear topcoat that will give your nails gel-like essie color and shine day after day.</p>

